If you’re using email for business purposes, sending from a @gmail.com address doesn’t look professional. You should send from your own domain name – e.g. yourname@yourdomain.com
The problem with free email providers
There are a number of different providers that allow you to send emails from your own domain for free. Most web hosts allow email hosting on your web server. (This is not recommended, but many hosts offer it. Email is so important I always recommend using a dedicated email server.)
Then there are some dedicated email providers, such as Zoho Mail, who have free plans that works well. However, none of those free providers have a webmail interface that comes close to the beauty and usability of Gmail.
The Paid Option: Google Workspace (formerly GSuite)
The good news is that Google make is easy to use the full Gmail interface with your custom domain name – so you can send from your own personalised email address – it was previously called GSuite, but is now called Google Workspace.
The bad news, is that it isn’t free.
However, it is very affordable, with plans starting at just USD $6 per month per user. If you’re starting a full-time business, then don’t go for the free option (below). Don’t be cheap! Just pay for Google Workspace – it is worth it!
The Free Option: Using Gmail with Your Custom Domain
But what if you are starting very small part-time business with no budget?
If you’re starting out and only expect it to be a very small business, and don’t have the budget for USD $6 per month for email, then there is a way you can use Gmail for free with your own domain name.
The overview: Here’s what you’ll need
- Setup a free Gmail account.
- Setup Email forwarding OR a POP/IMAP account
- Setup an SMTP service – for sending emails (one that has a free tier)
- Connect your SMTP service to the free Gmail account
This article will walk you through the steps.
1. Set up a free Gmail Account
If you haven’t already set up a Gmail account, do that now. Sign up for a standard free Gmail account. Whatever address you choose, you will need to login to Gmail with that address each time – however, when you’re emailing, your recipients won’t see this address.
Although not essential, it makes it easier if you have a dedicated Gmail inbox for this new domain that you want to send from.
2. Email Forwarding or a POP/IMAP account
Email Forwarding Option
This is the easiest option to use.
How you set up email forwarding will depend on your current setup.
Option A) Check if your domain registrar offers free email forwarding.
Depending on where you registered your domain, the domain name registrar MIGHT provide free email forwarding.
This is especially useful if you haven’t yet setup an inbox at your web host.
For example, when registering domains in New Zealand my preferred provider is 1stDomains.nz They have excellent features, including free email forwarding.
Wherever you’ve registered your domain, you’ll need to look to see if they have email forwarding. If they don’t, then you will need to use Option B.
Here’s what it looks like in the 1stDomains interface:
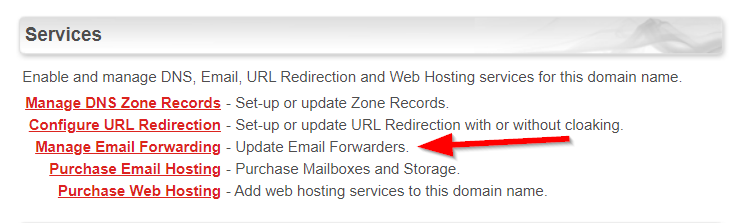
And then we setup the forwarder.
We can select the email address that we want people to send emails to at our domain name, which will forward to Gmail.
In the 1stDomains interface we can also add additional aliases – these are extra addresses at our domain name that will also forward to the same Gmail address.

Once setup, send your new email address a test email, and make sure that it arrives in your Gmail inbox.
Option B) Setup email forwarding at your web host
If you already have web hosting, then you can setup email forwarding at your web host.
Each host will have a slightly different way of setting this up, but the principle is the same.
When setting up a forwarder you can choose:
Either: Setup an email forwarder on it’s own.
OR: Setup an inbox (that can send and receive) and forward that inbox.
The difference is that if you setup just an email forwarder, then in the next step you’ll need a separate dedicated SMTP email sending service. This isn’t a problem, and we give you the steps below. This can actually help with email deliverability, because dedicated SMTP services offer things like DKIM for email authentication, which some basic web hosts don’t.
Or if you choose to setup an inbox, then you can use your one web server to both send and receive emails via Gmail. In one aspect this is nicer, because it is one system rather than two. But some email hosts don’t offer DKIM for email authentication, and you also run into the potential of filling up your web hosting space with emails.
Choose whichever option suits you. My preference is to use an email forwarder and separate dedicated SMTP email sending service.
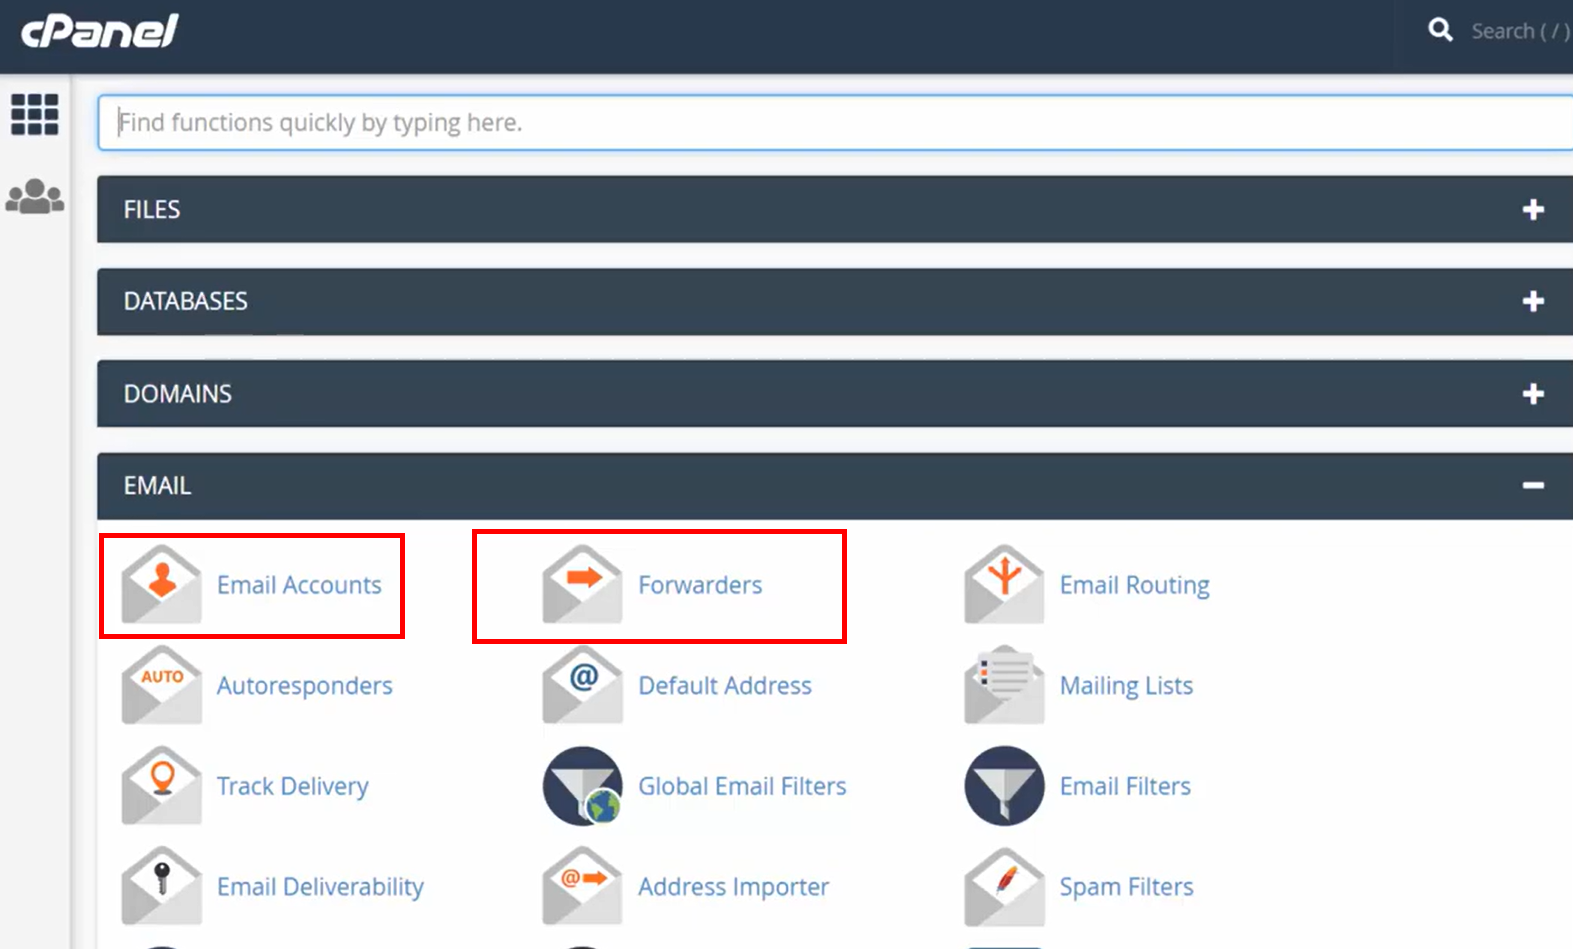
How it looks in cPanel
If your host is using cPanel, here’s a screenshot of what it looks like. You’ll either choose “Email Accounts” if your setting up a whole email account or “Forwarders” if you’re just setting up a forwarder.
Once setup, send your new email address a test email, and make sure that it arrives in your Gmail inbox.
POP/IMAP Option
Alternatively, instead of setting up email forwarding, if you already have a free inbox at your web host, you can get Gmail to retrieve emails from that existing inbox by POP or IMAP.
This isn’t my preferred method, but if you want to see a guide for this approach, see this article.
3. SMTP service – for sending emails
The next piece of the puzzle is to have an SMTP service for sending emails.
If you have setup an email inbox at your web host, then you can use their SMTP settings. (If using cPanel go to Email Accounts > Connect Devices and scroll down to the SMTP settings).
Alternatively, if you’re wanting to use a separate dedicated email sending service, a great option is Mailgun. Mailgun offers the first 1250 emails per month for free. If you think you’ll go over that, then additional emails are only $0.0001 – so an additional 1000 sent emails will only cost $1.
There are others out there that offer more emails per month on their free tier – such as MailerSend which offers your first 12,000 per month for free – HOWEVER MailerSend can’t be used with Gmail because it doesn’t allow you to choose the username that emails will be sent from.
If using Mailgun, when you setup the domain, do NOT setup a subdomain, like they recommend. Instead, just set up the main domain. In addition, do NOT add the MX records that they recommend in the DNS settings. If you add those, it will kill your email forwarding!
To setup the domain you’ll need to add DNS entries to verify the domain for sending. Once you add the DNS entries, it will generally take about 5 mins before the domain will be verified. Sometimes though the DNS changes might take an hour or two to be picked up.
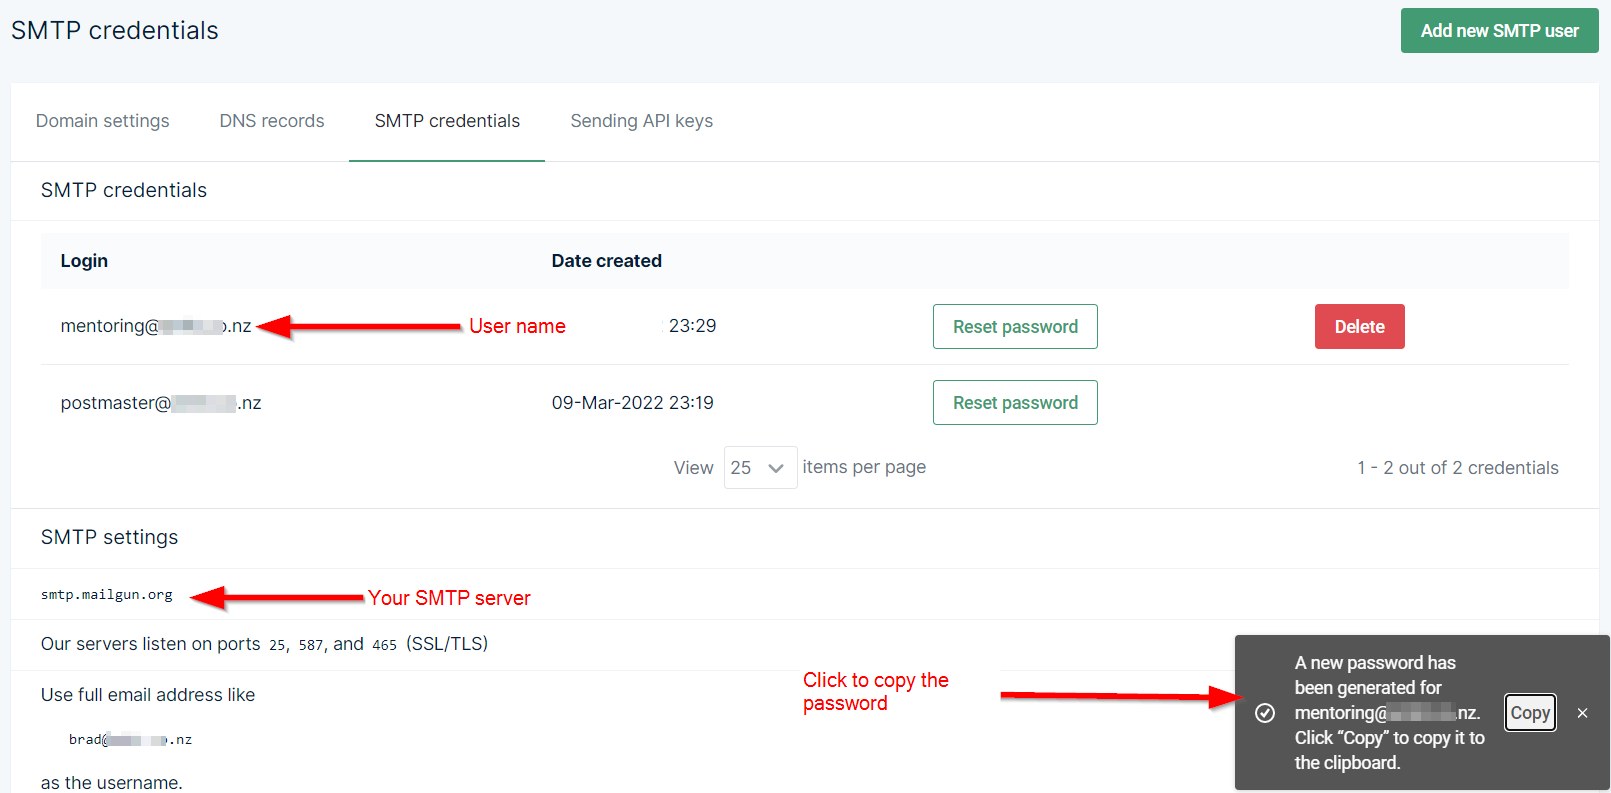
Get the SMTP credentials:
You now need to find the SMTP credentials.
In Mailgun go to Sending > Domains > click the domain > click “Domain settings” > SMTP Credentials
There will be a postmaster@yourdomain user. You now need to add a new user for the email address you want to send from.
Click “Add new SMTP user” and then for the username enter the email address you want to send FROM. This is the email that people will see.
When you add the user, a popup will appear saying a password has been generated for that user. You need to click “Copy” to copy the password.
Paste the password somewhere safe for now. You’ll need it shortly in Gmail.
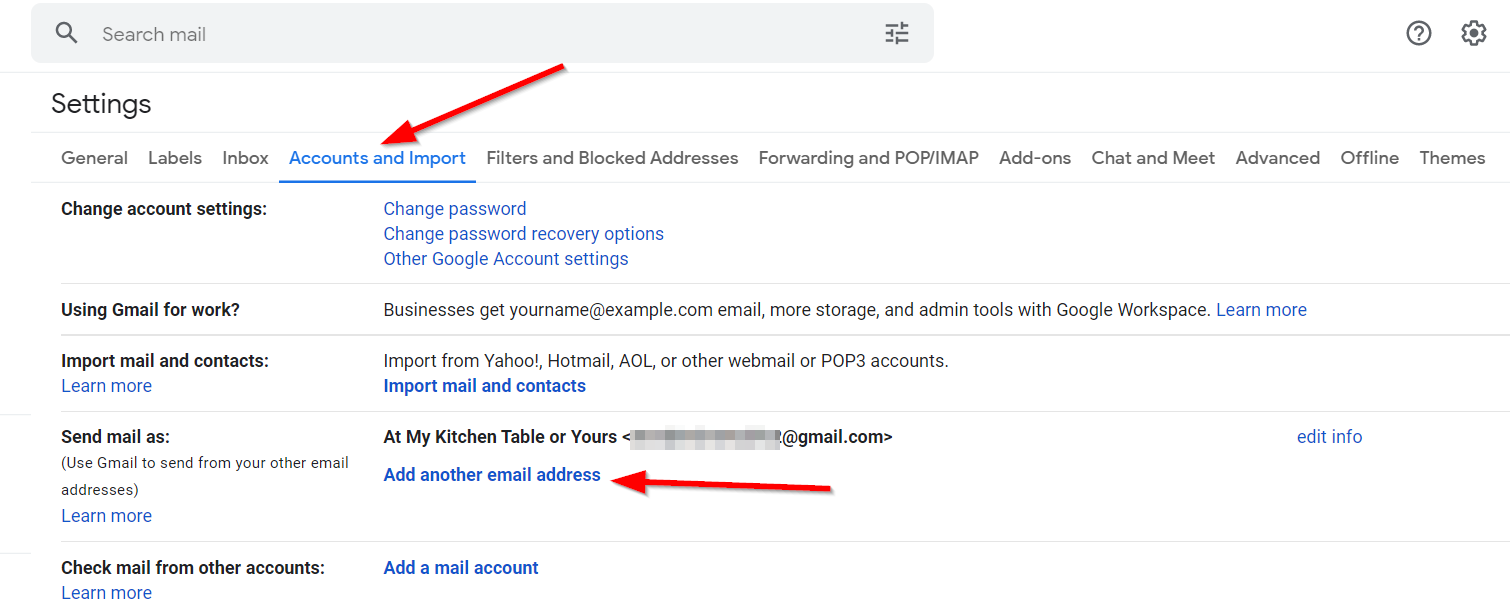
4. Connect your SMTP service to your standard free Gmail account
Now head over to your Gmail account. Go to Settings (Cog) > Accounts and Import > Send mail as > click “Add another email address”.
Now we need to go through the steps to connect the Gmail account to our SMTP (sending) server. This is what allows us to send from Gmail but have it send via our own personalised email address at our domain.
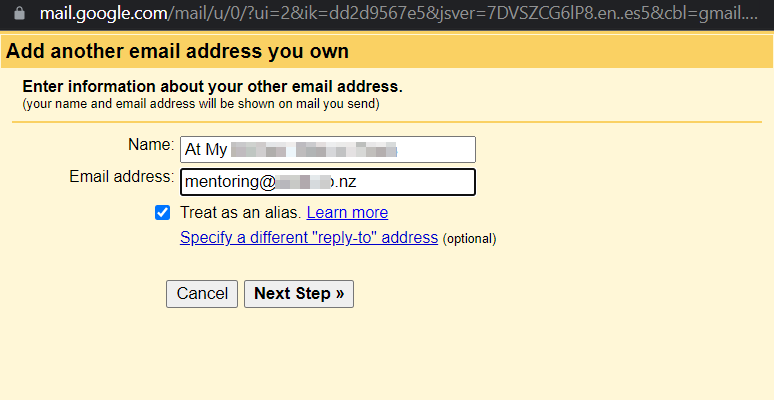
On the first screen, enter your email address that you want people to see when you send emails – name@yourdomain.com
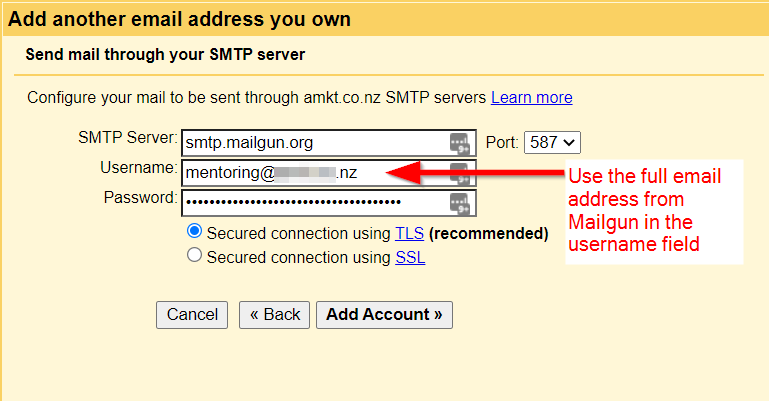
You will then need to enter the SMTP credentials from Mailgun:
And then you will need to verify this sending address. To verify, Google will send a verification code to that address.
Because you have set up a forwarder in step 1, this email will get forwarded to your Gmail account. So simply head back to your inbox to get the code. (Remember that this yellow window is a popup window running in a separate browser window, so just come back to this window once you have the code from the inbox.
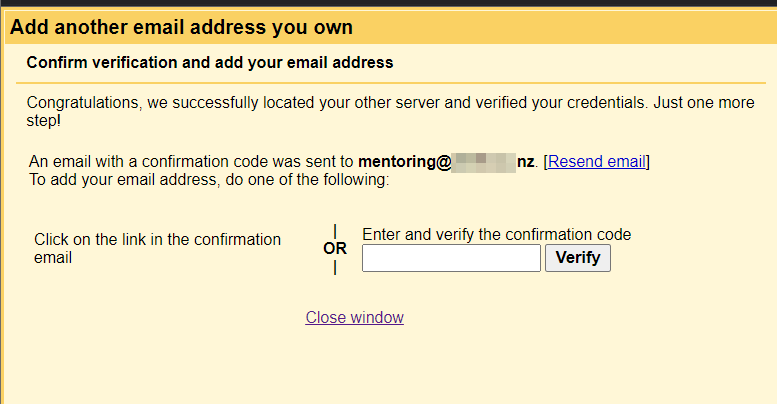
When you have verified the email address, the yellow popup window will automatically close.
Set Your Default Sending Address
The final step is to head back into Gmail settings and set your personalised domain email as the default address.
Only do this if you have set up your Gmail inbox as a dedicated inbox just for this address. If you are using an existing Gmail inbox that will be used for other purposes too, then if you want to send from your new address by default, follow these steps. If not, then you will just need to remember to select the correct “from” address whenever you want to send from your domain email.
Go to Settings (cog) > Accounts and Import > Send mail as (section) > beside your domain email click “Make default”.
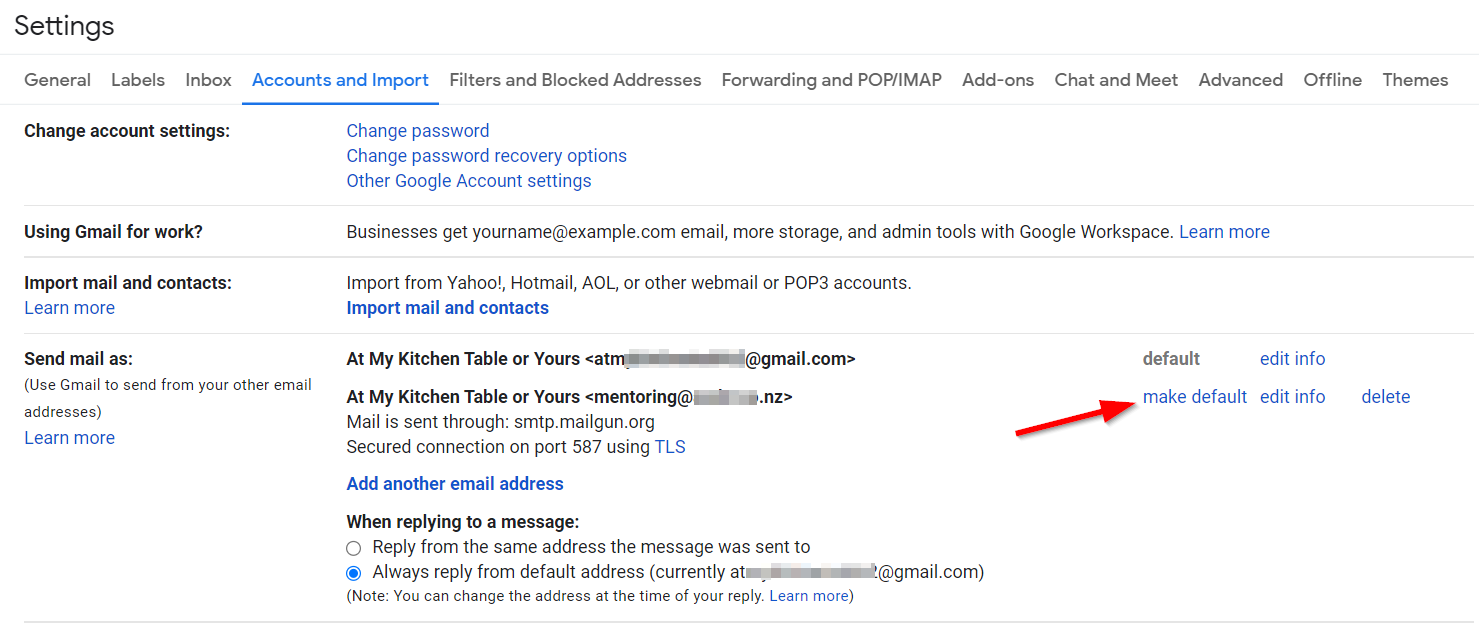
Once you’ve done that, just check that the “When replying to a message” setting is still set to “Always reply from default address” (seen at the bottom of the screenshot above).
And that’s it! You can now receive emails to your personalised domain name email, right into your Gmail account, and when you send, your recipients will see your personalised domain name email too.
Remember to Test
The final step is to test it all. From a completely separate inbox, send an email to your new address.
Check that it arrives in Gmail and then reply to it, and check that it is coming up as sending from your personalised domain email.
In addition, in Gmail, compose a new email message and check that the email is sent from your personalised domain email.
If it’s all working, you’re good to go. If not, you’ll need to revisit the steps above.